In the line of analog products Elektron recently release the Rytm 8 voice drum computer. It not only features analog drum synthesis but also can play samples. In addition you can create patterns and songs including parameter automation.
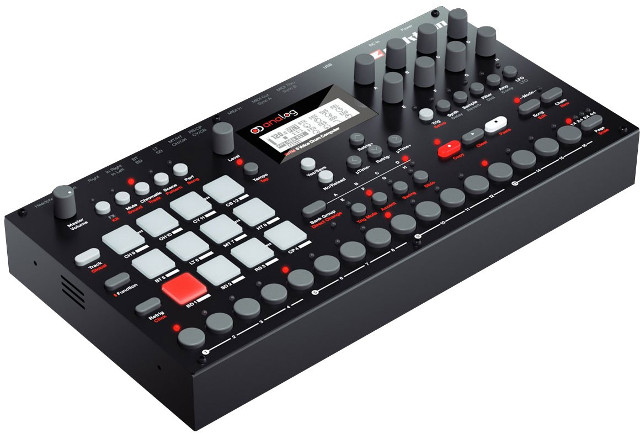
The Unit
The backside has the headphone output, the left and right outputs a stereo 1/4″ input and 10 separate outputs divided over 5 1/4″ jacks. Midi in/out/through, USB, adapter input and the power switch. Midi can be switched in turbo mode to use in combination with other Elektron instruments.
The front side has a main volume knob, five play and/or edit mode buttons. Twelve multi colored stamp size pads. Track selection, function and retrigger button. Underneath are 16 step buttons for x0x style editing with a page selection button on the right. In the middle the level data entry controller, a control knob and a lighted LCD matrix display. Down there are two command, four cursor buttons and five bank selection buttons. At the right the 8 controller knobs, the six synthesis selection, the record/start/stop and sequence mode buttons. The LCD matrix has a limited viewing angle so I do wonder if an OLED would be preferable because its more clear and has wider viewing angles.
Synthesis
Drum synthesis is of course analog and is divided into several groups to provide for different drum sounds. Kicks, snares, toms, hihats, cymbals and rim shots. So when creating a kit you have to take in account there is an order to create several drum sounds. Mind you that these sound are meant for electronic drum sounds and have the features you can expect from your typical electronic drums.
Every synthesis slot also can be complemented by a sample and/or external input. That sample can be a drum sound, a stab/chord or a single tonal sound. You can upload your own samples using the USB connection and the C6 software downloadable at the Elektron website. Limitations to the samples and re-sampling are handled in the C6 software. The uploaded sample is put on a temporary spot and can be assigned to the desired sample slot from there. So changing samples is a bit of a hassle that requires extra manual steps. The manual also advice to switch midi off during sample transfers. So you’re close to the edge of technical possibilities here.
All sounds do have an dedicated envelope and LFO that can be routed to two modulation slots. The LFO is sync able to the tempo. The filter has its own envelope and features a 12db, 24db low pass and high pass mode a band pass mode and a peak filter. The filter also self resonates so also can be used as a sinus generator. Compared to the Analog4 the filters are a bit more clean and have no overdrive option.
Drum triggering not only handles synthesis and sample usage but also triggering envelopes and LFO. The amplification menu also has the option to use send levels for the reverb and delay effects.
Effects
The effects section features a tape delay emulation and a generic reverb delay which can be used as send effects. They sound very useful as to the reverb it really doesn’t have a plate option, so there is where the individual outputs come in handy.
In addition you can use an distortion that can be switch pre/post in regard to the delay and reverb. The distortion also can be used in combination with delay to create a proper nasty sounding distorting tape delay. What I do like of the distortion is that it doesn’t alter the dynamic content of the drums and gives it more of a bite. The compressor also is catered for dynamics although it behaves like a true analog compressor and will smother the dynamics at extreme settings. So it is probably better to keep the compression to a minimum and use the mix option for parallel compression as well so you can blend it in the way you want to. Having a gain reduction meter comes in handy here.
Controller surface
The responsiveness of the drum pads is something you have to learn to use. I do not know if that will change in time if you start to use the pad more but comparing them with golden MPC standard they seem to need way more pressure and have a fairly steep velocity curve.
The surface of the Rytm clearly is designed for easy access to change parameters on the fly during sequencing because of basic operations are possible to change with one hand. The knobs feel solid and the buttons will not be activated if you just look at them. Like any other Elektron device the build quality is very good and the metal casing makes it a sturdy device that should be able to handle quite some abuse.
Sequencer
When you start sequencing the start is simple. Choose a pattern, set the length, the measure and hit record. Then you can either play the sequence using the pads or selecting a track and use the sequence buttons to create the sequence x0x style.
When using a tonal sample you even can use the chromatic mode to play a tune using the pads. Afterwards you can edit the sequence details and even apply parameter automation or adjust micro timing although that can get quite time consuming. You also can adjust the swing parameter for fast results to get some groove going on.
Parameter automation enables you to alter synthesis parameters or effect parameters for every step of the sequence for every track by selecting the step and turning the knobs of the parameters you’d like to change.
This will enable you to get extremely creative with the drum sounds and create lots of variations. This workflow is more elaborate and takes more work than most other drum synthesizers so you have to take that into account.
You still can use your DAW as the main sequencer and use the Rytm as a traditional midi controlled drum synthesizer including parameter automation. Especially when you want to use the audio in the box to mangle it up and perform on the fly re-sampling techniques. For that usage you should use the USB because it has a higher bandwidth that your traditional 30 year old midi standard.
The internal sequencer is most suited for live venues and allows for fast improvisations. Most simple would be muting different tracks. The operation manual is very clear. Normally I just check it during reviews for the readers. This time I had to use it to find out how to use the Scene mode. The scene mode can get pretty complicated because it’s basically a snapshot setting of up to 16 parameters independent from the used drum kit. Typically used for breaks or variations during sequencing and of course to create the ultimate drop.
You can create a scene, assign the parameters similar as you would do with automating separate sequence steps and store these settings. During playing you can choose between these different scene presets. Or use performance settings which are basically sets of combined parameters you can alter during playing. Creating songs or chaining patterns is fairly trivial. The same goes for copying sounds, tracks and patterns.
Overlap
Elektron also has the Analog4 and the Octatrack so there is an overlap of sounds and functions. It depends on what you are looking for and you can chose the one or ones you are most comfortable with. Just a Rytm and an analog poly synth should go a long way though.
Elektron did release a 808 sample kit at introduction half price to put into the Rytm. But if you want 808 sounds you should get an 808 because only an 808 sounds like an 808 (yes I do own one). The Rytm is suitable to go way beyond the 808 range sounds thanks to the extensive parameter editing options and that is what it makes such an interesting drum synthesizer to come up with creative and rich sequences if you are willing to put in the time.