The DDJ-T1 is a MIDI controller/interface from Pioneer. However, … this is not ‘yet another’ DJ controller. Working with the Pioneer DDJ-T1 just feels exactly like playing with two CDJs and a DJM mixer, but with the benefits of ‘digital dj’ing’.
What’s in the box?
– Of course the DDJ-T1
– Power supply unit
– Power plugs (UK and Europe)
– USB cable
– Traktor CD with Licensecode
– Manual (which I didn’t use during the review)
 INs/OUTs
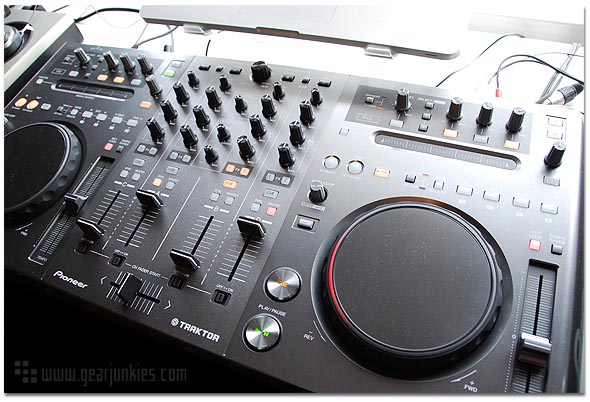
Not completely un-important are the ins and outs of the DDJ-T1. At the rear we have two master outs, one balanced jack (TRS) and the other a RCA connection (nice for the club or at home). There’s also an AUX input with a little gain control, which comes in handy when connecting to a CD player. On the other side there is a USB port and the on/off power switch. At the front of the DDJ-T1 we have the IN for a microphone (jack) en an out for the headphone (for a ‘little‘ and ‘big‘ jack plug).
Hook it up!
To get the DDJ-T1 going is pretty much easy. There aren’t many difficult actions you have to perform. Install the driver, install Traktor, hook up the USB cable between your laptop and controller, turn ON the power, and that’s pretty much it! You are off! One thing to keep in mind is the installation of Traktor! If you have Traktor already installed this new install will overwrite the existing installation. So keep that in mind!
 The DDJ-T1 can run on USB power. For example if you are on loaction and don’t have any power at hand. But, … the lights and the headphone output only run on 50%. The mic input doesn’t work at all. This is only because you can’t run so much (needed) power through a USB cable/plug.
Browsing
The DDJ is designed just so you don’t have to touch your laptop anymore. It has a big knob at the top with which you browse/scroll through your playlists. Is the playlist display/screen too small for you, … press the big button and you go full-screen. Next to this button you have other press buttons to switch playlist and load the selected tracks into your decks. Anyone with any DJ experience will have this method down in minutes (seconds). Meaning it’s very easy to operate.
 Let’s mix!
On the mixer part of the controller isn’t much to tell. Anyone with the slightest DJ experience knows how to work with a DJ mixer. However, I want to mention two items here, and those are the Master and Sync buttons on each channel. These buttons are relatively new, but what do they do exactly?
If you press the Sync button, the track playing in that channel will be synced to the master channel. The master track will be defined by the Traktor software. If you want to change the master track to another channel just press the … Master button of that channel! Just be sure that this channel is active and playing!
The decks
The decks (left and right of the mixer) look like a CDJ-400 had a scuffle with a CDJ-2000 and with a touch of Traktor. The jogwheel, pitchfader and the play-cue, loop-in and loop-out made me think of the CDJ-400 and don’t need much explanation. However the hot-cue buttons, the auto-loop rotary knob and the filter button are different. According to Pioneer the internal mechanism of the jogwheel has been improved on the CDJ-400. However, as I never worked with a 400 I couldn’t compare the two.
The hot-cue buttons work a bit different then on a CDJ-2000. Firstly you have eight cue points now, instead of three (or four with ‘shift’ button). Setting and removing cue points is easy and wont be any problem for a DJ. Even if it’s slightly different you’ll learn this quick and easy.
The same hot-cue buttons can be used to skip through a track whilst it’s playing on the beat. Very usefull if you started a track a bit too late and want to make it catch-up a beat, so to speak. By pressing a button next to the delete button you can change the function into ‘move’. Other function you can set are the beat length and the skip movement, backwards or forwards.
 Another new feature is the built-in Filter. Standard in Traktor is a filter on each channel (just like the color effect ‘Filter’ on the DJM-800 and DJM-2000). This is very handy as it doesn’t take up a seperate effect unit and let’s you set a filter on the fly, just when you need one.
The effect unit works with the (IMO popular) four button system. Traktor uses for each effect unit, of which you have two to your disposal, four rotary and four press buttons. This means with chain effects you have a dry/wet button for the whole chain and three rotaries for each parameter per effect. This might sound confusing for non-Traktor users but for Traktor users this will make sense.
Something that deserves a bit more attention is the switching of effects. Between the dry/wet buttons and the other three buttons there are the buttons for choosing your desired effect. You can browse through the available effects and with the shift button pressed you browse back. The issue I want to adress is the fact that the effect unit is positioned just above the needle search. So if your hand/finger touches the needlesearch by accident, which is completely imaginable, ‘bad things‘ can happen of course during a live performance. You have to focus on this! You can give the needle search a different function or even ‘disable’ it with the function button.
Conclusion
This is one amazing DJ controller. Yes, it is not a cheap one, but one thing is certain and that it is worth it! During my time with this controller, doing this review, I found myself playing a lot with it. Much more then usual when doing reviews. It’s that much fun! However if there’s anything I could point out something I am missing it’s some decent VU meters, but maybe that’s because of my audio-technical background. However, my final verdict is, if you have the budget for it? Don’t hesitate, this is the DJ controller you want!
Wytse Gerichhausen
We like to thank Pioneer Benelux for the review unit.