It is not quite the secret that Native Instruments stands at the top of the ‘digital dj’ing world’ with their Traktor DJ software. Especially here in Europe they have a firm grip on the market and are the most used DJ software available. However, Serato comes in a strong second and is growing as we speak. Many DJs love the no-nonesens approach of Serato and also the collaboration with Ableton with The Bridge brought a lot of attention to the brand. I have been able to work with this Kontrol F1 for some time now and will give you my findings about this controller. I’ll try to keep it short and concise. However this is more difficult said then done as the Kontrol F1 is such a comprehensive controller / software combination.
Traktor 2.5. Update
A couple of months ago Native Instruments came with a respond to Serato with the introduction of Remix Decks in the 2.5. update of Traktor. Instead of 4 samples per deck we got 4 x 4 samples per deck, and even that times 4! So in total we now got 64 samples (or one-shots) per deck to play with. Next to samples you now can even load a complete track into a cell. If you work with Maschine you could even drag loops directly into a Remix Deck cell. From here on I will talk about a sample even if you can load several types of audio files into a Remix Deck.
Without any more explanation it is pretty clear that this creates a lot of new possiblities and opportunities for your live set. Native Instruments wouldn’t be who they are if they hadn’t developed a specific DJ controller for this. Introducing, … the Kontrol F1! This is a dedicated DJ Midi controller for the new Remix Decks. At the moment it is even the ONLY controller that gives you total control over the Remix Decks. The F1 is built with a similar housing as the X1 controller. So you can use the same bag or decksaver with it.
Remix Decks
The Remix Decks can hold so much information that it is hard to get a proper overview on your screen. You have continuous 16 samples at your disposal, spread over 4 channels. Each channel has its own volume setting and filter (lowpass/highpass). Then also you get the option to switch between 4 different banks with 16 samples. For each sample you can switch functions on/off as well! You could try to work this all out on your screen but with the Kontrol F1, you get so much more clear overview. The F1 has all these functions layed out in a number of clear sections. With the ‘shift’-button you can activate functions you don’t use that much.
Mixer
For each channel (4) per remix deck you can set the volumes and filters seperately of eachother with 4 faders and 4 rotaries. With the shift-button pressed you can set the gain of each sample seperately, if the sample volume isn’t right.
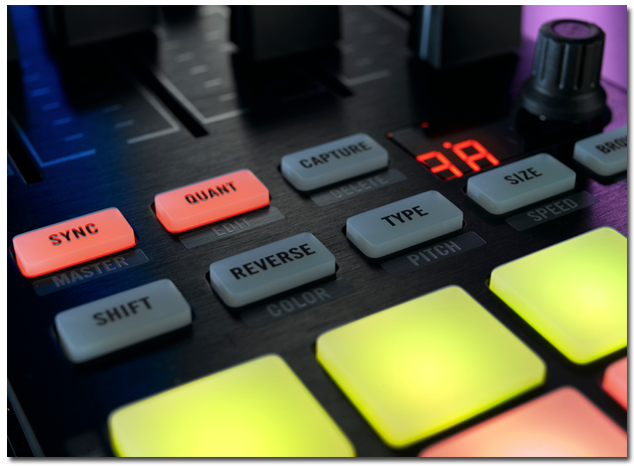
Function buttons
With these buttons you’ll get direct access to any function of the full remix deck, like Browse, Sync and Quantise. Then there are seperate cell functions like Capture, Size and Reverse. With the shift-button pressed you’ll get another seperate function for each button, which you will use mainly when preparing for a set. Functions like color editting, speed, or location of a sample.
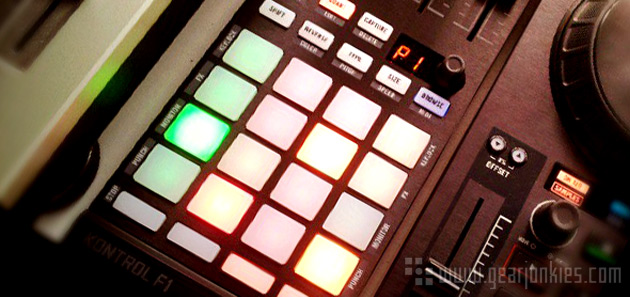
Pads
With the pads you’ll have a continuous availability of 16 samples, 4 per channel. By means of the Browse rotary knob you can switch between the four different banks. Because of the different colors of the pads you can get a lot of information. For example you could give all your beat or rhythmic samples the color blue. Next to that, all your pads get different colors with different function buttons. For example if you are in the playtype mode, all looped samples have the color green and all one-shots are blue. If you want to alter the color settings for this, you just need to press on the pad of a particular sample. If you keep the shift-button pressed, you will see on the pads (per channel) if functions are activated: keylock, FX, monitor and punch. If you press on a pad you can switch a function on or off.
Display
A small display gives just a little, but useful, information on the functions you are using. If you are using the Edit function for example, you can choose with the Browse rotary button between Copy Paste, Cut Paste, Offset or Nudge. These functions are then displayed with abbreviations like CP, CT, Of and NU.
Use
Personally I think the use of the Kontrol F1 is twofold. At one hand it gives you the opportunity to use the remix decks very quickly and awesomely with the extra (free) remix content. But on the other hand the F1 requires a lot of your own creativity to get the maximum out of this puppy! One thing is pretty obvious and  that’s the fact you won’t fathom all its functions in one go! For this you have to put some effort into it. Like we are used from Native Instruments there isn’t a comprehensive (hardcopy) manual for the F1. However, they have made a number of clear and useful video tutorials, where most of the functions get explained in detail. Important to watch these videos!
Preparation
The new remix decks in Traktor have a major advantage over the old sample decks, because now we can load a complete Remix Set in one go. You don’t have to load each cell seperately. This speeds up the workflow a lot when using different remix sets. With the creation or modification of a remix set you don’t have to remember what fitted with what, because you can just continue where you stopped. There is one thing to be aware of however and that’s the fact that there is no UNDO function. I noticed that when I accidentaly put a captured sample over another existing sample. You’ll have to watch that!
The copy-paste or moving of a sample is very easy (if you watch where you put them), so you can make different configurations of your samples very easy and quickly. You can go for the option to have them autosaved or to save them manually. I prefer the manual option so you can always go back if you did something wrong. A quick tip here is to save a remix set under a new name, so Traktor will create a new remix set, without changing anything to the existing remix set. Saving is fast and easy by just pressing the shift-button and de browse rotary button.
Post-Fader Effects
You can apply effects very nice with the Remix Decks, as you can assign the different channels to an effect. This allows you to assign an effect to the entire Remix Deck or just to one or multiple channels. This way you could put a delay effect on just your highs, without letting the low end shoot the audio signal into the red!
Another feature I think is very cool, is the fact that the effects are post-fader. This means you can let a delay sound on even if your fader, on the F1, is closed again (to 0). It is something I have always missed in Traktor but, apparently, it’s possible! Especially with mixing transitions between tracks, you can use this feature for an extra fun effect by sliding the fader up and down for just the ‘echo’.
Operating Multiple Remix Decks
You can operate multiple remix decks with one Kontrol F1. By pressing the shift-button and the browse rotary button you can switch between the available remix decks. Four pads will light up in yellow. Top left is deck A, top right is deck B, bottom left is deck C and bottom right is deck D. However a deck has to be set to being a remix deck!
The use of multiple decks with just one F1 is surprisingly simple, however there is one drawback in my opinion. The controller works under a ‘Hard Takeover’ policy which means that the software duplicates the setting of the buttons, faders and filters. So for example if your volume settings with the Remix Decks (in your software) are down and on your controller the faders are up, and you touch them, they will shoot up immediately in your software as well. I would have preferred a ‘Soft Takeover’ option much more, because then you could put the fader in the right setting without affecting the software settings.
Midi Mode
Let’s not forget the F1 is also to be used as an ordinary midi controller. With a useful overlay you can use it with the most important functions of the regular track decks in traktor. This should be very useful for time-code systems. To utilise two decks in full you’ll need to create a mapping. Take a look on the Traktor Bible website for handy tips and tricks on this subject. In my opinion it should be possible to create a good mapping for two decks and an external mixer.
An issue I didn’t like so much was the fact that with mapping some functions you had to create modifiers yourself if you want to use the shift-button. With the Kontrol S4 this works much better. A button gives another code when you press-hold the shift button, so it is much easier to map double functions.
Verdict
So, … is the Kontrol F1 worth its price of 249 Euro? That’s a decision everyone has to make for themselves, but for me? Every penny! This controller has such a great integration with the Remix Decks in Traktor, which makes it so easy and fast to work with. The basic functions are always immediately at your disposal and with the pads, faders and filters you can become creative quickly. Even functions and features you don’t use that often, but are still important, are accessible through the controller, so that the F1 becomes a ‘total solution’. I’d like to see that Native Instruments would release some more edit functions in the preferences in future updates, because I still think a ‘Soft-Takeover’ option is a missed opportunity.
Allthough I love the Kontrol F1 personally, I do think it is not for anyone. If you are an average DJ who mixes tracks and uses loops or samples just sparely, you are pretty good off with your S4, S2 or any other Traktor compatible DJ controller. This F1 is really intended for the Digital DJ who wants to take things to the next level, who wants to go beyond the traditional way of mixing sets. So if you want more then a few cue points and some loops, this Kontrol F1 will be a great addition to your DJ setup. Especially if you make music yourself you could add these elements to your performance with the F1 without using extra software.